Introduction
This guide is called getting started. It is not meant to be a complete guide to TeamPick and it, most certainly, is not intended to be a complete guide to KickAbout. It is intended as a quick start guide to introduce the new player to the TeamPick utility and to help get you started in the wonderful world of KickAbout.
Should anyone have any problems or questions regarding the TeamPick utility then please email me (paul_sutton@ntlworld.com) and I will endeavour to help.
Good luck!!!!
And I hope you have as much fun with KickAbout as I have!!!
Paul Sutton
Contents
Registering your copy of TeamPick
Running the Programme for the First
Time
Loading a .kik File from an email
Loading your Team (Creating a
fixture file)
Contracts, Auctions and Transfers
tab
Sending Your File to SpellBinder
What is TeamPick?
TeamPick is a utility that has developed over a number of years to aid KickAbout players in managing their teams. The very first version of TeamPick let you manually enter your players and then use the programme to try different formations. Whilst this still forms the core of TeamPick we have, over many years, refined and improved the program. Many of these features and improvements have been added as the result of suggestion from players.
TeamPick is now the most powerful utility (in truth it is the only utility!) ever developed to assist you in your quest for KickAbout glory. Using TeamPick you can perform all the functions required to complete your KickAbout turn. TeamPick will format your turn into an .rtf document and email this to SpellBinder as an attachment.
Whilst it is still vital that a new manager, or an existing manager, must read and understand the KickAbout rulebook this version of TeamPick will help to ease a new manager into the game by assisting you with the administrative chores.
TeamPick comes bundled with a version of the KickAbout help file that has been formatted into a Window’s help file. You can access context sensitive help at any time by pressing the F1 key. The help file contains the entire KickAbout manual along with some short guidance notes about the TeamPick program
Registering your copy of TeamPick
The TeamPick utility is free to any player who signs up for the ShowMatch service. If you sign up for the ShowMatch service you can run the programme in “full data mode”. Each session SpellBinder will send you an update by email. This email will contain your team’s .kik file. This file can be loaded directly into TeamPick and contains all your updated details.
Running the Programme for the First Time
After you first install TeamPick you need to run it just once from the start menu of your computer by…
§ Click Start button
§ Select All Programs
§ Select SpellBinder
§ Select TeamPick
On the first occasion it is run TeamPick will gather some important data – like your name and will also register the file type .kik with the Windows registry. Once you have done this you will able to open the files that SpellBinder send you by double clicking the attachment in the email. This will automatically load the file into the TeamPick programme.
Now the hard part – you will have to wait for your first .kik file to arrive from SpellBinder
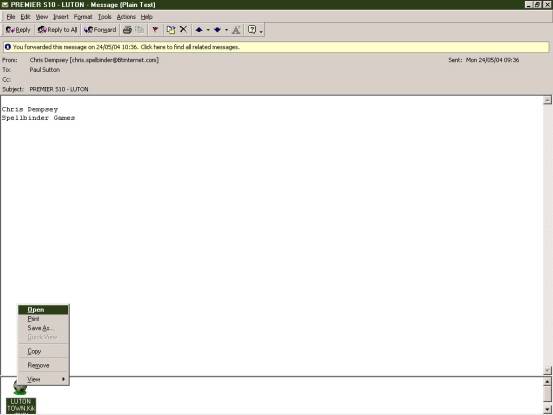
Loading a .kik File from an email
SpellBinder will send you an updated .kik file for your team each session. Once you have run TeamPick once it will have registered the .kik file as a TeamPick file. Now it should be possible to load the file directly into TeamPick by opening the attachment of the email.
The exact steps required will vary depending upon which email client. The following instructions apply to Outlook and Outlook Express but other programs will be similar
- Open the email
- Right click on the attachment icon (may look like a paperclip or a football)
- Context sensitive menu should pop-up
- Select Open
Loading your Team (Creating a fixture file)
When you load your team for the very first time the programme will not be able to locate a fixture file and will ask of you wish to create one.
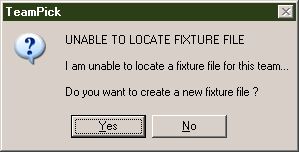
I would suggest that it is worth investing the time and effort into creating and maintaining a fixture file so answer yes to this question.
The programme will then search your hard-drive for fixture structure files and will present you with a list of files…
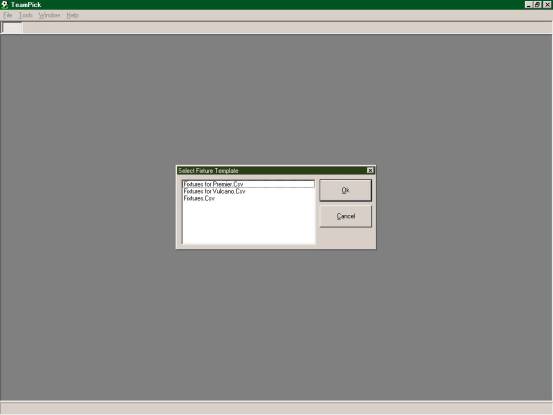
Fixtures.Csv is the structure for a standard league. You should select this file unless your team is playing in one of the special leagues.
Turn Sheet Tab
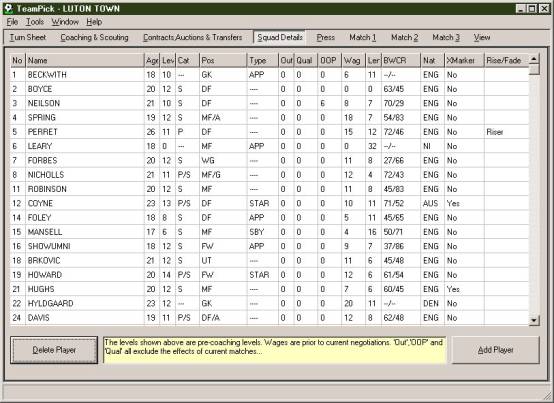
The .kik file should load directly into TeamPick. The first tab will show your turn sheet. This is an electronic rendition of the first couple of pages of your hard-copy turn sheet that you will receive in the post. It shows your current squad of players and other key details about your club.
In the screenshot below you can see the squad-sheet for the mighty Luton Town…
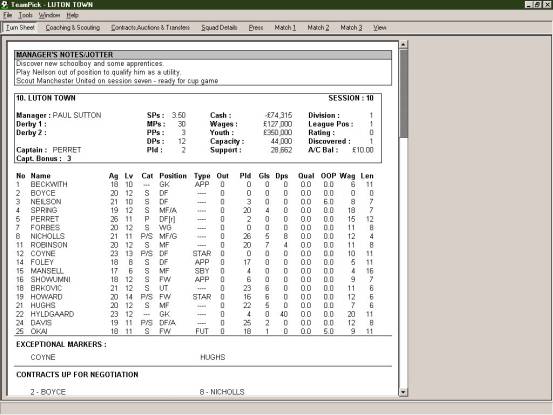
Notice that the program stores and presents information about your team on different pages or tabs. Initially, the view will be set on the team sheet tab but you can view other info by clicking on the selector for the other tabs (i.e. Coaching & Scouting, Match 1 etc)
Creating a Fixture List
We would suggest that one of the first things that you should is to enter the fixture list for your team. This only needs to be done once a season. Whilst it takes a little time we would suggest that the investment is worth it as it means that you don’t have to look up your fixtures each session and perhaps more importantly the programme should help you not to miss that vital cup game!!
At the start of each season Spellbinder supply you with a start-up pack for your team. This start-up pack includes the season’s fixture list. Typically the initial fixture list will contain…
- All the League fixtures
- The first round of the Cup
- The fixtures for the League Cup
To enter your fixture list you need to select the menu option <Tools> <Fixture List>. The fixture list tool should pop-up at the current session.
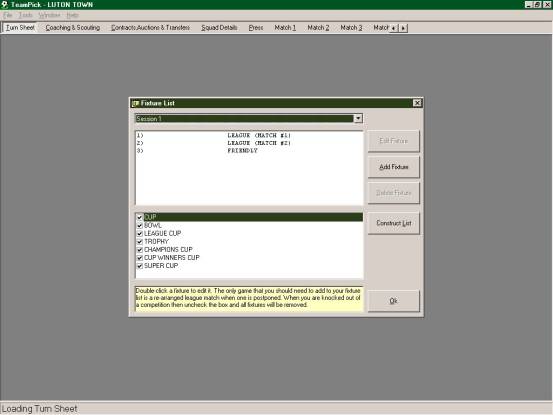
By default, all the competitions will be turned on. If you are just starting out the chances are that you will not be in any of the European competitions so you can deactivate the Champions Cup, the Cup Winners Cup and the Super Cup.
Now let’s enter the details of our first league game by double clicking on the first fixture - League (Match #1)
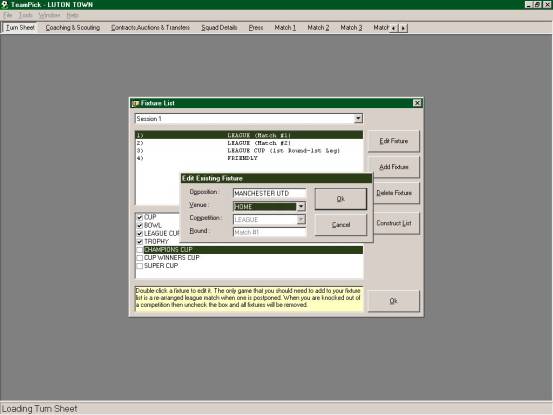
The pop-up form asks you for the details for the match (i.e. your opponents and the venue)
Notice at the top of the tool there is a drop down combo for selecting the session. So complete all the details of the first session and then move on to complete the details for the other sessions (sessions two to sixteen)
Some of the competitions (Bowl and Trophy) are drawn later on in the season so you may not be able to complete these initially.
If you get knocked out of a cup competition then you should deselect this competition in the lower half of the tool and all the fixtures for that competition will be removed
Coaching and Scouting Tab
The program tabs are laid out in a fairly logical sequence so typically we would expect a user to work their way along the various tabs (left to right). All the screens are dynamic so you can change or amend any of your selections and revisit tabs as often as you want. Changes made to one tab will automatically update the information on the other tabs
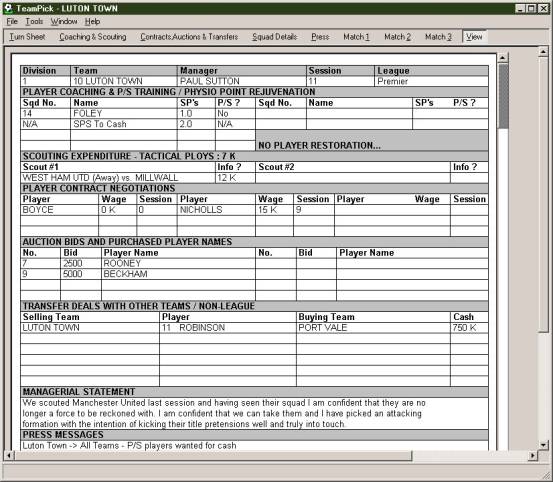
The most important function of this tab is that it allows you to increase your players’ levels by coaching them. You can see in the screen shot below that I am using 1 of my available SP’s (total available = 3.5) to coach my promising young defender Foley from level 8 to level 9.
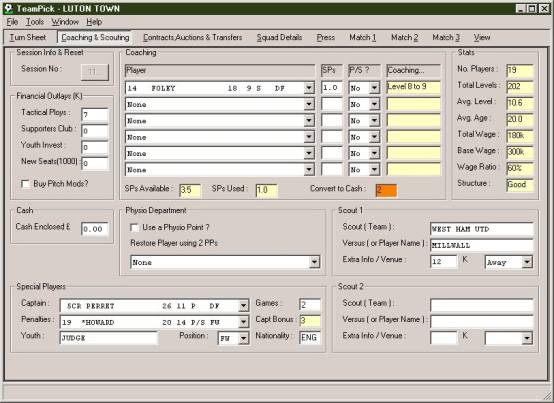
After using 1 SP to coach Foley I will have 2.5 SPs left to coach other players.
Selecting a New Captain
Also on this tab I can nominate a player to be my captain. As you select the player the program should automatically fill in the number of captain’s games that this player has played and calculate the captain’s bonus that he will get
You should also ensure that you select your best player to take your penalties and don’t forget to nominate a youth player just in case your back room boys turn up a real find
Financial Outlays
The coaching tab lets you commit finances to a number of financial outlays but we would suggest that maybe you should get a feel for your club’s finances before committing to any of these options (see rulebook for more details)
Scouting
This tab also lets you dispatch your scouts to scout other teams. You need to tell your scout which match to watch and also you may want to commit some cash to gain extra information. You will see that as we have an important cup-tie with West ham coming up I have dispatched my scout to watch West Ham play Millwall at the New Den. I have invested 12k in attempting to gain some extra info.
Physio Department
Also, you can use this tab to instruct your Physio Department. I have decided not to use a physio point up this session as I want to retain them for that important cup run!!
Contracts, Auctions and Transfers tab
Strangely, this tab allows you to manage contracts, auctions and transfers
Contracts
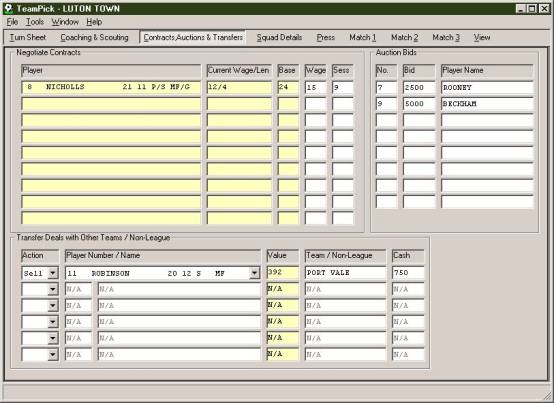
The program will automatically know about the contracts that are due for renewal and will show you a list of those contracts that need to be negotiated this session. As you will see I have only got one contract due for renewal and I have made Kevin Nicholls an initial offer of 15k for 9 sessions. This is quite a long way beneath his base wage but as I have still got four sessions to conduct negotiations I thought I might chance a derisory bid in the hope that his love for the club will persuade him to accept!!
Auction Bids
New players are periodically made available for auction in the newsletter. I have decided to bid 2500k (2.5 million) on Rooney and 5000k on David Beckham as both players could be a useful addition to my squad.
Transfer Deals
This tab enables you to wheel and deal by transferring players to or from other clubs. In the above example I have decided to sell my midfield dynamo to Port Vale for a cool ¾ million
Squad Details Tab
This tab is a legacy from the older versions of TeamPick. It has been left in for the sake of completeness but, if you are using the programme in full-data mode (i.e. receiving .kik files from Spellbinder), then you shouldn’t really need to use any of the editing functions on this tab.
Add Player
The only function that we would expect you to need to use would be the “Add Player” button that allows you to discover new apprentices and schoolboys.
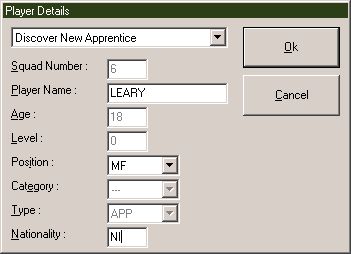
When you click on the button the programme will invite you to enter some key details like name, position and nationality.
Press Statements Tab
This tab can be used for communicating with the GM and other players

Managerial Statement
Use this section to explain your tactics and plans to the GM. Whilst this isn’t compulsory, it does aid the newsletter writer and if you enter a managerial statement your team are far more likely to be featured in the newsletter.
Press Messages
Use this section to notify the GM of any messages that you wanted inserted into the Press Column of the next newsletter
Messages to GM
This section is for any comments or remarks that you want to make to the GM.
Manager’s Jotter
This feature is new with this release of TeamPick. It allows you to jot down notes and reminders for yourself. These notes are stored on your computer whilst your turn is away being processed and then when you next load that team’s .kik file the notes are presented on the first tab (Turn Sheet Tab)
Match Tab
The program will create a match tab for each of the matches that you entered into your fixture list. This is the exciting part of the programme and the part that really gives you an edge over your competitors. You can use TeamPick to drag and drop your players into different formations. Try out different formations and tactics and see the impact on your team’s levels.
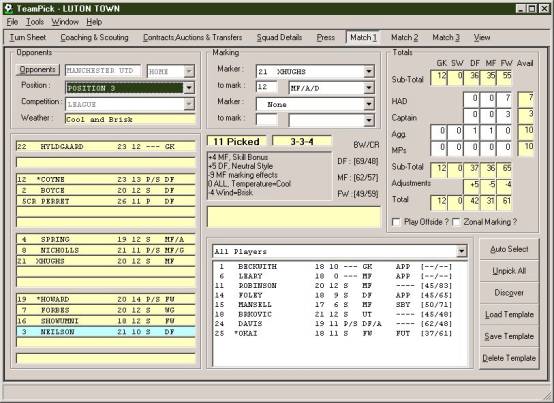
Opponents
If you have created a fixture list then your opponent will automatically be entered into the match tab. You will need to tell the program what position your opponents are in as the difference between your relative league positions affects the HAD/PD bonus.
Selecting Your Team
The white list box will initially contain all your players. You should drag and drop them into the yellow slots of your team-sheet. The team slots are grouped into the areas of the field…
- Goalkeeper
- Sweeper
- Defence
- Midfield
- Forward
- Substitute
Clearly, you must select a goalkeeper and a substitute. A sweeper is optional. The other areas of the team sheet contain a maximum of five player slots as this is the maximum number of players in one outfield area. As you drag the players over the team slots the cursor changes between a smily face and a sad face indicating where a particular player may be dropped.
In the example you can see that I have selected my Danish keeper Hylgaard to play in goal and I have decided to play a 3-3-4 formation against Manchester United
Also, in the example you will notice that Neilson is a different colour from the rest of the players. This is because I am so confident that we can beat Manchester United that I have chosen to play him out of position as I am trying to qualify him as a utility.
As you pick your players the rest of the screen will be dynamically updated. The formation and the effects of any weather adjustments will be shown in the middle frame whilst your team’s area totals will also be updated.
Auto-Select Button
The auto-select button is a quick way of populating your team-sheet. It will either duplicate the previous match in the session or pick the best eleven players. It is not foolproof and it is in no way intended to indicate the best formation. It is simply an aid designed to pick the best eleven players in the most likely areas of the team sheet.
Marking
The successful manager will be using scouting and marking to improve his team’s chances. In the example shown I am instructing my exceptional marker Hugh’s to mark the opponents MF/A/D. A new feature added to TeamPick in this version is that the (likely!) effects of marking are shown in the adjustments frame. You must have previously marked a team in order to get their “scouting numbers”
Totals
Your team’s area totals are shown in the top right hand corner of the screen. You can then apply available adjustments like your home advantage, captain’s levels and motivation points.
Discover
This button performs the same function as the “Add Player” button on the Squad Details tab. It allows you discover apprentices and schoolboys and is placed here to save you jumping backwards and forwards when picking a team for a friendly.
View Tab
When you have finished making all your decisions we recommend that you take a moment to view the completed turn-sheet to ensure that you haven’t forgotten anything or made any errors.
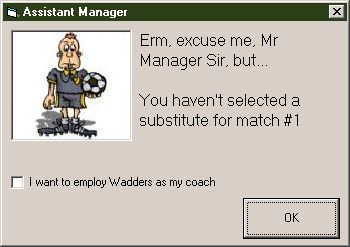 New
to this version of TeamPick is an assistant manager who will double-check your
turn for any obvious errors or omissions. Did you spot the deliberate error?
New
to this version of TeamPick is an assistant manager who will double-check your
turn for any obvious errors or omissions. Did you spot the deliberate error?
Sending Your File to SpellBinder
When, you have completed your orders and are convinced that you have done everything you can to get that vital victory you should send your orders to SpellBinder. Assuming that you have an email account the TeamPick programme can create your oders in an .rtf file and automatically post them to SpellBinder.
To do this you should select the menu option <File> <Create File for Spellbinder>. The programme will whiz and whirr for a minute and then should notify you that the email has been successfully created…
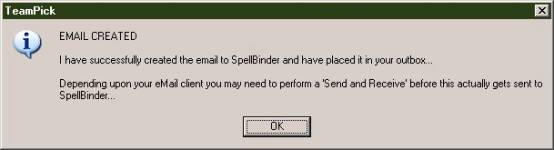
Exactly what happens next depends upon what email software you are using and how it is configured. The email might have already been sent or, alternatively, it may be waiting in your outbox for you to do a “send and receive”.
Quitting the Programme
As you close the program your file should be saved to your hard-drive. Typically, if you originally started the programme by double-clicking an attachment in an email, the changes you made will also need to be saved back to your email. As you close TeamPick and return to your email client you will see a message like…
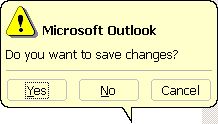
This will save the changes that you made to the attachment back to your email message.
Paul Sutton 30/05/04